Over 16,536,405 people are on fubar.
What are you waiting for?

Stevens's blog: "How To's"

created on 12/20/2008  |  http://fubar.com/how-to-s/b266817  |  196 followers
(How To) Lounge Functions²

Many members want to know what functions they have when they first create a lounge. Some know of these functions while others are completely confused and need help understanding what functions are currently present or what they can do with each function. Below is Part 2 of 3 of my (How To) Code Lounges segment I am currently creating.

This blog will give "Members", "Lounge Owners" and "Lounge Staff" better insight of what is inside the different lounge functions and "How To" better use them to their own advantage. If anyone still needs help understanding the can fell free to contact any of Fubars Volunteer Coders and get the answers they need to better help them with whatever is relevant.


Lounge Wrapper

This section encovers the entire lounge and the content behind each of the functions below

This is the code that represents the wrapper

.new_lounge_wrapper {
  background-image: url('URL to image here');
  background-size: 100% 100%;
  background-attachment: fixed;
  background-position: 0% 0%;
  background-repeat: no-repeat;
}

Motd_Area

The MOTD is where most of a lounges main content goes into

4133981076.png

This is the code that represents the MOTD

.new_lounge_wrapper div.new_lounge_motd_div {
  visibility: visible;
}

User Colors

Stevens    

Stevens    

Stevens   

Stevens   

Stevens   

Stevens   

Stevens   

Stevens   

Stevens   

Stevens   

Stevens   

Stevens   

Stevens   

Stevens   

Stevens   

Stevens   


Chatbox Codecs

Saybox

The say box is the entry way into the chatbox portion.
Its pretty much where everything is typed before being placed onto the chatbox

say: 
.new_lounge_wrapper div.new_lounge_shoutbox_enter_data {
  visibility: visible;
  margin: 10px;
  margin-bottom: none;
  width: 69%;
  height: 30px;
  position: relative;
  top: -360px;
  ~top: -26.5px; /*Controls Functions For IE7+*/
  _top: 0px; /*Controls Functions For IE6 & Below*/
  border-top: 2px groove rgb(255,165,0);
  border-left: 2px groove rgb(255,165,0);
  border-right: 2px ridge rgb(255,165,0);
  border-bottom: 2px ridge rgb(255,165,0);
  -moz-border-radius: 5px;
  -webkit-border-radius: 5px;
  border-radius: 5px;
}
.new_lounge_wrapper form#new_lounge_enter_data_form input {
  width: 90%;
  background-color: rgb(248,248,255);
  font-size-adjust: 0.58;
  color: rgb(0,0,0);
}

Chatbox

The chatbox is where eveything that was typed in the saybox gets placed

tn_1271987482.gifStevens: This is the text for staff members   delete
tn_3556354186.jpgSCRAPPER: This is the text for non-staff members..   delete
.new_lounge_wrapper div.new_lounge_shoutbox_div {
  visibility: visible;
  height: 800px;
  width: 69%;
  overflow-y: scroll;
  overflow-x: auto;
  margin: 10px;
  background-color: rgb(0,0,0);
  position: relative;
  top: -375px;
  ~top: -38px; /*Controls Functions For IE7+*/
  _top: 0px; /*Controls Functions For IE6 & Below*/
  border-top: 2px groove rgb(255,165,0);
  border-left: 2px groove rgb(255,165,0);
  border-right: 2px ridge rgb(255,165,0);
  border-bottom: 2px ridge rgb(255,165,0);
  filter: alpha(opacity=100);
  -moz-opacity: 1.00;
  opacity: 1.00;
  -khtml-opacity: 1.00;
  -moz-border-radius: 5px;
  -webkit-border-radius: 5px;
  border-radius: 5px;
}

Staff / Non-Staff Codecs

Below is the extra areas (ie. Enter/Exit/Subscribe/Rounds/Notices).

StaffNon-Staff
.new_lounge_wrapper span.new_lounge_staff_shout {
  color: rgb(255,255,0);
  font-size: 10pt;
  font-family: arial, times new roman, san sarif;
  font-weight: bold;
}
.new_lounge_wrapper td.lounge_shout_msg {
  color: rgb(248,248,255);
  font-size: 10pt;
  font-family: arial, times new roman, san sarif;
  text-align: left;
}
Enter NoticeExit Notice
.new_lounge_wrapper td.lounge_enter_notice {
  visibility: visible!important;
  font-size: 10pt;
  color: rgb(248,248,255);
  font-family: arial, times new roman, san sarif;
}
.new_lounge_wrapper td.lounge_exit_notice {
  visibility: visible!important;
  font-size: 10pt;
  color: rgb(248,248,255);
  font-family: arial, times new roman, san sarif;
}
Round NoticeEmote Notice
.new_lounge_wrapper td.lounge_round_notice {
  visibility: visible!important;
  font-size: 10pt;
  color: rgb(248,248,255);
  font-family: arial, times new roman, san sarif;
}
.new_lounge_wrapper td.lounge_shout_emote {
  visibility: visible!important;
  font-size: 10pt;
  color: rgb(248,248,255);
  font-family: arial, times new roman, san sarif;
}
Subscribe NoticeChatbox Notice
.new_lounge_wrapper td.lounge_shout_subscribe {
  visibility: visible!important;
  font-size: 10pt;
  color: rgb(248,248,255);
  font-family: arial, times new roman, san sarif;
}
.new_lounge_wrapper td.lounge_shout_notice {
  visibility: visible;
  font-size: 10pt;
  color: #7FFF00;
  font-family: arial, times new roman, san sarif;
}
Lounge Room Notice
.new_lounge_wrapper div.new_lounge_notice_div {
  junk;
  color: rgb(0,255,0);
   2;
  top: 550px;
  left: 350px;
}

Lounge_Info

The Lounge Info box is where all the lounges information is held
(ie. Lounge Name, Subscribed Members, Date Lounge was Created, and The Owner of the Lounge)

 lounge info
name:Lounge Name Here
members:??
created at:2007-09-24 05:00:00
created by:Owner Name Here
.new_lounge_wrapper div.new_lounge_info_div {
  visibility: visible;
  background-color: rgb(0,0,0);
  top: -50px;
  right: 0px;
  filter: alpha(opacity=95);
  -moz-opacity: 0.95;
  opacity: 0.95;
  -khtml-opacity: 0.95;
  position: relative;
  width: 25%;
  margin: 10px;
  margin-bottom: 5px;
  clear: right;
  overflow-x: hidden;
}
.new_lounge_wrapper div#new_lounge_info_div {
  border-top: 2px groove rgb(255,165,0);
  border-left: 2px groove rgb(255,165,0);
  border-right: 2px ridge rgb(255,165,0);
  border-bottom: 2px ridge rgb(255,165,0);
  -moz-border-radius: 5px;
  -webkit-border-radius: 5px;
  border-radius: 5px;
}
.new_lounge_wrapper table.lounge_info {
  height: 15%;
}
.new_lounge_wrapper th.lounge_info {
  font-size: 16px;
  color: rgb(255,0,0);
  padding: 5px;
  font-family: arial, times new roman, san sarif;
  font-weight: bold;
  border-bottom: 1px groove rgb(248,248,255);
}
.new_lounge_wrapper td.lounge_info {
  zoom: 100%;
  font-size: 12px;
  background-color: transparent;
  color: rgb(248,248,255);
}
.new_lounge_wrapper td.lounge_info a {
  color: rgb(248,248,255);
  font-weight: bold;
}

Lounge Options

The Lounge Options box is where all the main lounges links are contained

.new_lounge_wrapper div.new_lounge_opts_div {
  background-color: rgb(0,0,0);
  top: -55px;
  right: 0px;
  filter: alpha(opacity=95);
  -moz-opacity: 0.95;
  opacity: 0.95;
  -khtml-opacity: 0.95;
  position: relative;
  width: 25%;
  margin: 10px;
  margin-top: 5px;
  margin-bottom: 5px;
  padding: none;
  clear: both;
}
.new_lounge_wrapper div#new_lounge_opts_div {
  border-top: 2px groove rgb(255,165,0);
  border-left: 2px groove rgb(255,165,0);
  border-right: 2px ridge rgb(255,165,0);
  border-bottom: 2px ridge rgb(255,165,0);
  -moz-border-radius: 5px;
  -webkit-border-radius: 5px;
  border-radius: 5px;
}
.new_lounge_wrapper table.lounge_opts {
  height: 15%;
}
.new_lounge_wrapper th.lounge_opts {
  font-size: 16px;
  color: rgb(255,0,0);
  padding: 5px;
  font-family: arial,times new roman, sans serif;
  font-weight: bold;
  border-bottom: 1px groove rgb(248,248,255);
}
.new_lounge_wrapper td.lounge_opts {
  text-align: left;
  padding: 5px;
  font-size: 14px;
  background-color: transparent;
}
.new_lounge_wrapper td.lounge_opts a {
  font-weight: bold;
  color: inherit;
}

Online_Member_Box

The Lounge Online Member box shows who has entered into the lounge.
When the member leaves the image will disappear from the same box.

  • tn_2656084990.gif
.new_lounge_wrapper div.new_lounge_online_user_list_div {
  background-color: rgb(0,0,0);
  text-align: center;
  height: 250px;
  width: 26%;
  overflow-y: auto;
  overflow-x: auto;
  position: relative;
  top: -115px;
  ~top: -60px; /*Controls IE Functions*/
  right: 0px;
  filter: alpha(opacity=95);
  -moz-opacity: 0.95;
  opacity: 0.95;
  -khtml-opacity: 0.95;
  border-top: 2px groove rgb(255,165,0);
  border-left: 2px groove rgb(255,165,0);
  border-right: 2px ridge rgb(255,165,0);
  border-bottom: 2px ridge rgb(255,165,0);
  -moz-border-radius: 5px;
  -webkit-border-radius: 5px;
  border-radius: 5px;
   1;
}


If you have any further questions about this or any other topics about the different functions for lounges
Please feel free to leave a comment on this blog or private message a Fubar Bouncer and they will try to help you the best they can.
For faster results you can also visit the Support Lounge and the staff/members will help you to the best of their abilities..

Be on the lookout for the Live version of a Lounges Code (Template 1 / Template 2).


© This blog is subject to change at any given time

© This blog does have a copyright notice and cannot be copied unless given permission by its owner


Copyright© Lounge Functions™ ~ All Rights Reserved
Updated Blog: 01/16/2018 - 22:50 EST
Blog Designed/Moderated by: §tevens
click tracking

(How To) Lounge Settings

(How To) Lounge Settings

So you want to code a FUBAR Lounge.. This will be a 2 part blog. The first part will show what the different functions look look inside a lounges Edit Lounge link and the second part will show members the different style codes for the Lounges basic areas (ie. Say Box, Chatbox & Info / Options / Members Box(I will not include the bottom boxes because they may require custom coding the member / coder is gonna have to add themselves). Pleas dually note to be able to create a Lounge a fubar member must be at the minimum level of ten or have at least $100,000 fubucks. I can only give members the basic knowledge to code lounges, pleas note I cannot determine if this will work for all lounges as each may hold a different task or setting. I have set up two Fully Functioning Lounge Template Blogs (called Lounge_Template_A & Lounge_Template_B). I will no longer be including the style codes (ie. <style type="text/css"></style>) since fubar has everything placed in the Skin Tab. If you feel you are still lost and need help coding your lounge please send a private message to a Volunteer Coder and they will help you get your lounge coded to your specifications.

General

The General tab is where the Lounge Settings are Placed

General
Skin
MOTD
Music
Video / Custom 1
Custom 2
Custom 3
Promote
Modify general lounge settings
lounge name:
lounge keywords
(enter up to 10 keywords for your lounge, separated by commas, to show up in more lounge searches)
privacy setting - NEW!publicuser must be logged in to enter loungeuser must have primary photoapproved salute is required to enter loungemembers & invite onlystaff & invite only
posting type:nonecommentsthreads
display feed/chat boxprofanity filter
 
lounge icon:lounge.74234176.png
(click on icon to change it)

(click to delete icon)
Please upload your new lounge icon


Skin

The Skin Tab is where the Lounge'ss Pure CSS codes are placed.

General
Skin
MOTD
Music
Video / Custom 1
Custom 2
Custom 3
Promote
Last change made by: Stevens (xx [sec/min/hour/month] ago)
NOTE: For this to work correctly with your skins, please omit all HTML tags, including the STYLE tag. They will be added around your skin code, automatically.
edit lounge skin:
Click here to upload a CSS file
   

MOTD

The MOTD Tab is where the CSS Images and Other HTML Content is Placed

General
Skin
MOTD
Music
Video / Custom 1
Custom 2
Custom 3
Promote
Last change made by: Stevens (XX months ago)
 
Would you like to customize?
default motd style:
div.new_lounge_motd_div{text-align: center; font-size: 18px; margin: 10px;}

To customize,copy this and click the Skin tab.
Then, paste or enter what you you see above.
Make the changes that you would like.
edit lounge motd:


Music

The Music Tab is where the Lounge's Music or Customary HTML/CSS can be placed.

General
Skin
MOTD
Music
Video / Custom 1
Custom 2
Custom 3
Promote
Last change made by: Stevens (XX months ago)
 
Would you like to customize?
default motd style:
div.new_lounge_motd_div{text-align: center; font-size: 18px; margin: 10px;}

To customize,copy this and click the Skin tab.
Then, paste or enter what you you see above.
Make the changes that you would like.
edit lounge music:


Custom 1-3

The Custom Tabs can be used for positioning different HTML elements (ie. cams, embeds etc...)

General
Skin
MOTD
Music
Video / Custom 1
Custom 2
Custom 3
Promote
Last change made by: Stevens (XX months ago)
 
Would you like to customize?
default motd style:
div.new_lounge_custom1_div{} div.new_lounge_custom2_div{} div.new_lounge_custom3_div{}

To customize,copy this and click the Skin tab.
Then, paste or enter what you you see above.
Make the changes that you would like.
edit lounge custom 1-3:
All css/style tags should be put with the Skin box.


Managing Lounge Staff

This setting is used for the Lounge Owner (Staff the Owner delegates to) to control what the lounge staff can and cannot do.

Please be cautious to what you give your Lounge Staff.

Security permissions:
  • silence - The ability to mute patrons and delete lines of chat text
  • eject - eject a patron from the lounge
  • ban - unban/ban a patron from the lounge
Skin/DJ/Design permissions:
  • skin - edit your lounge skin
  • motd - edit your lounge MOTD
  • music - change your lounge music
  • custom - change your three custom content fields
Co-owner functionality:
  • staff - user can hire/fire mods, change staff permissions! Also able to silence/eject/ban other mods
  • settings - permission to change lounge name, emotes, tags, privacy, posting type, icon, profanity filter, etc.
 
nametitlesilenceejectbanskinmotdmusiccustomstaffsettings
Owners Name
Staffs NameYesNoYesNoYesNoNoYesNoYesNoYesNoYesNoYesNoYesfire

Viewing Lounge History

This setting was set up so the Owner / Delegated Staff Member, can see what has been edited within the Lounges Settings.

Viewing lounge history

descriptionwhen
Lounge Staff Member just edited a lounge setting / areaxx sec/days ago

Customizing Lounge Emoticons

Many Lounge Owners love this setting since it allows them to either use the predetermined lounge emote system or to create their own customary emote they'd like to use within the Lounge Parameter.

Custom Emotes:
Customize your lounge even more with your own emotes! Emotes are actions users can perform on eachother in lounges such as 'hug', 'high-five', etc...
  • name - name of your emote
  • format - the actual output of your emote. (%to% gets substituted for the other person's name)
Once you create a custom emote, you have the choice to "Copy Default Emotes" or you may choose to have only the emotes which you have created.
Example emote setup:
  • name - format
  • barf - barfs on %to%'s shoes
This will produce the following emote:
=== fu_Member barfs on fubar shop's shoes
name
format


 namepreview
deleteemote name=== fu-Member Name uses this emote all over fubar shop

In closing this blog is meant to show a member what is inside the Lounge Edit Lounge Link
(located on the Lounge Options Box).

The blog that shows the different functions inside the lounge is (How To) Lounge Funtctions.


If you have any further questions about this or any other lounge topics
Please feel free to leave a comment on this blog or private message a Fubar Bouncer and they will try to help you the best they can.
For faster results you can also visit the Support Lounge and the staff/members will help you to the best of their abilities..


© This blog is subject to change at any given time

© This blog does have a copyright notice and cannot be copied unless given permission by its owner


Copyright© Lounge_Settings™ ~ All Rights Reserved
Updated Blog: 05/19/2017 - 00:15 EST
Blog Designed/Moderated by: §tevens
click tracking

(How To) Screen Grabbing

(How To) Screen Grab

Have you ever wondered "How Does One Capture The Screen On Their Moniter??". On every Standard Keyboard there is a "Print Screen" function commonly called [PrtScrn], in the operating system that copies the contents of the Entire Screen or just the Active Window to the clipboard, which can then be pasted into a graphics application to print or upload to a image hosting site like Imgur. Here is an example of what a Standard Keyboard looks like.

Below will be some steps on Screen Capturing:
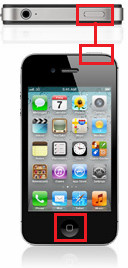
  • (How To: Capture The Entire Screen) ~ Windows Edition
    1. Press the Print Screen key on your keyboard. It may be labeled [PrtScn].
    2. Open an image editing program, such as Microsoft Paint.
    3. Press the Ctrl Key and the V key once the Image Program is open
      Please Note: This will capture the current Screen Resolution your moniter supports.
    4. Edit the Image to how you see fit.
    5. Once your done editing go to the File Menu and choose Save As.
    6. Navigate to the folder where you want to save the image.
    7. Type a file name for the image.
    8. Select a file type(Preferrably PNG[Portable Network Graphic]).
    9. Click the Save button.
  • (How To: Capture The Entire Screen) ~ Macintosh Edition
    1. To capture the entire desktop, press Command-Shift-3.
      ~ The screen shot will be automatically saved as a PNG file on your desktop.
    2. To copy the entire desktop, press Command-Control-Shift-3.
      ~ The screen shot will be placed on your clipboard for you to paste into another program.
    3. To capture a portion of the desktop, press Command-Shift-4.
      ~ A cross-hair cursor will appear and you can click and drag to select the area you wish to capture.
      ~ When you release the mouse button, the screen shot will be automatically saved as a PNG file on your desktop.
      ~ (The file is saved as PDF in Mac OS 10.3 and earlier.)
    4. To capture a specific application window, press Command-Shift-4, then press the Spacebar.
      ~ The cursor will change to a camera, and you can move it around the screen.
      ~ As you move the cursor over an application window, the window will be highlighted.
      ~ The entire window does not need to be visible for you to capture it.
      ~ When you have the cursor over a window you want to capture,
      just click the mouse button and the screen shot will be saved as a PNG file on your desktop.
      ~ (The file is saved as PDF in Mac OS 10.3 and earlier.)
    5. Add Control to the two shortcuts above to place the screen shot on the clipboard instead of saving it to the desktop.
    6. Another method on Mac OS X systems is by using the bundled Apple utility, Grab, located in the Applications > Utilities folder.
      ~ Grab is useful if you need to include a cursor or a menu in your screen shot,
      or if you want to save your screen shot to TIFF format.
      ~ To include a cursor, first go to Grab Preferences and select the cursor icon you wish to have in your screen shot.
      ~ To capture the screen with Grab, run Grab, then choose of the capture modes from the "Capture" menu:
      - Selection
      - Window
      - Screen
      - Timed Screen.
    7. When you choose the Selection mode in Grab, you can capture a specific region of the screen by dragging around it.
      ~ Grab will display a tooltip showing the size of the region you have selected and the screen shot
      will open in a window when you release the mouse button.
      ~ The cursor will not be included.
    8. When you choose the Window mode in Grab, an instruction window will appear asking you to select the window
      you wish to capture, then click the "Choose Window" button.
      ~ When you click the button, the instructions will disappear and the window you click ill be captured,
      including the mouse cursor at the position where you click(if a cursor was selected in Preferences).
    9. When you choose the Screen mode in Grab, an instruction window will appear asking you to
      click the screen when you are ready to capture.
      ~ The mouse cursor will be included in your screen shot at the position where you click
      (if a cursor was selected in Preferences).
    10. When you choose the Timed Screen mode in Grab, an instruction window will appear,
      allowing you to prepare your screen for capture.
      ~ When you are ready, press the "Start Timer" button and you will have ten seconds before the screen is captured.
      ~ This allows you to open menus and sub-menus, if necessary. After ten seconds the entire screen will be captured.
      The mouse cursor will be included in your screen shot if a cursor was selected in Preferences.
  • The content for Macintosh Systems was found on Graphicsoft.com

Screen Capturing On Mobile Devices

Apple iPhone(iOS):

This just may be iPhone 101 for many members but all the while Apple has pretty much snuck a New Feature into their 2.0 Firmware Update. This feature allows everyone to capture a screen on the iPhone with just the touch of two buttons.

Follow the 5 Steps below to capture a screen using Apple's iPhone:

  • Step 1: Locate The Home Button and the Sleep Button (Image Shown below)

    home_lock

  • Step 2: Go to the area in which you want to capture (ex. image, website, note, etc...)
  • Step 3: Click both the Home Button and the Sleep Button at the same time (You should see a flash occur)

    Side Step: For those on iPhone 4s press the Sleep Button first then press the Home Button and the same flash will occur.

  • Step 4: Go into your Photos App and locate the image you just captured(Image Examples Shown Below)

    App_Location

    Photo_Location

  • Step 5: Upload the image to a different App (Facebook, Photobucket, etc..)

Android(Google):

It took me getting an actual Android based phone to figure out how to get a screenshot from the hot keys (like iPhone has). I found taking screenshots of the device was as simple as pressing (and holding for three seconds) the Sleep button and the Volume Down buttons together, and the current screen got saved under what is known as the phones Gallery.

Follow the 5 Steps below to capture a Mobile Screenshot on an Andriod Device:
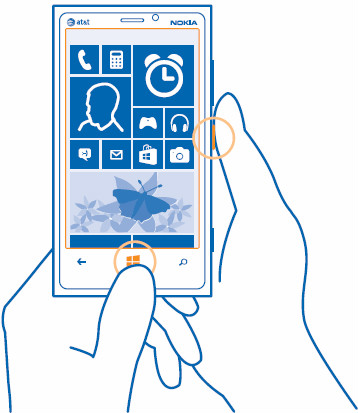
  • Step 1: Locate The Sleep Button and the Volume Down Button (Image Shown below)

    sleep_voldown

  • Step 2: Go to the area in which you want to capture (ex. image, website, note, etc...)
  • Step 3: Press & Hold (For Three Seconds) both the Sleep Button and the Volume Down Button at the same time (You should see a flash occur and hear a shutter sound)
  • Step 4: Go to your phones Gallery and locate the image you just captured(Image Examples Shown Below)

    Image A
    sshot_1

    Image B
    sshot_2

    Image C
    sshot_3

    Image D
    sshot_4

  • Step 5: Upload the image to a different App (Facebook, Photobucket, etc..)

BlackBerry(WebOS):

blackberry_backup

Courtesy: BlackBerry.com


Windows Phone:

Windows based phones use a different approach to taking a screenshot and below is how to do it (with minimal images unfortunately) and the images that are shot is uploaded to the Photos Gallery as well as to your SkyDrive account.

Follow the 4 Steps below to capture a Mobile Screenshot on an Windows Device:

  • Step 1: Press the Power Key and the Start Key at the same time. (Image Shown below)

    windows_sshot

  • Step 2: Locate The Photos App On Your Phone.
  • Step 3: Locate The Screenshots Folder Within Your Photos App.
  • Step 4: Tap & Hold The Image To Share It With Everyone.

In Conclusion:

  • There is also many different online screen capture programs (Also Screen Capture Apps)(like PrntScr). These programs are just like the paragraphs mentioned above and each works a different way. Make sure when you download a screen capture program or application the program is compatible with your system or mobile device.

If you have any further questions about how to set up a mobile address or upload images
Please feel free to private message a Fubar Bouncer and they will try to help you the best they can,
For faster results you can also visit the Support Lounge and the staff/members will help you to the best of their abilities..


© This blog does have a copyright notice.

This blog cannot be copied unless given permission by its owner


Copyright© Screen Grabbing ~ All Rights Reserved
Updated Blog: 07/08/2018 - 22:04 EST
Blog Designed by: §tevens
click tracking

(How To) Manage Family

(How To) Manage Your Family

Everyone who has a Family List on Fubar wants to pick and choose which member they want as their #1 choice as Top Family. Each member can utilize this feature and choose up to Twenty-Five members to be in their Top Family. Also each member can organize their Families to better show off other members.

This blog will give the following:
- Show How To Add To Family,
- Show How To Make A Member A Top Family Member,
- Show A Live Look Of The Manage Top Family Page.


Adding Member To Family

To add a member to your Family List you must first add that member to your Friends List (making the member a Top Friendwill not make them a Top Family Member). Also before you move on you can read the blog titled (How To) Manage Your Friends as it will also have another feature that will show you how to add a member as a Top Friend.

The below steps will show you how to make a member who is already on your Friends List a Family Member

Open Your Desired Browser

open_browser

Direct Your Browser To Fubar.com & Locate The Login Area

fubar_website1

Once You Have Logged In Successfully Go To Your Friends Page

stevens_profile

Once You Are On Your Friends Page Locate
The Link Named Add To Family And Click It

family_add

Once You Have Clicked The Add To Family Link
A Confirmation Page Will Load

family_confirm

The Page Will Take About 5-10 Seconds To Load
Then The Page Will Re-Load To Your Family Page

family_page

This Member Will Now Be A Member Of Your Family

To Add This Member To Your Top Family Read Below.


Adding Member To Top Family

Now that you have added the member to your Family List you can now add that member to whats known as a Top Family Member.
This feature allows you to Add and Re-Arrange a list (25 maximum) to better suit who you want visible on your profile.

Below will be a Live Example of what the Moderate Family Page looks like.

Below is the table area to rearrage your 25 Top Family Members

to view this just click this Link

Manage your 25 Top Family
This section shows a selected member from your family list

Username Here
profile_1
United States

Remove from Family
The Button above removes the member from ur Top Family List
0-50 of your Family
The list below shows everyone on your family list whether it be 1 or 50
User 1 User 2 User 3 User 4 User 5 User 6 User 7 User 8 User 9 User 10 User 11 User 12 User 13 User 14 User 15 User 16 User 17 User 18 User 19 User 20 User 21 User 22 User 23 User 24 User 25 User 26 User 27 User 28 User 29 User 30 User 31 User 32 User 33 User 34 User 35 User 36 User 37 User 38 User 39 User 40 User 41 User 42 User 43 User 44 User 45 User 46 User 47 User 48 User 49 User 50
The button below adds the member to your top family
Add To
Top Family -->

<-- Remove From
Top Family
The Button above removes the member from ur Top Family List
Top Family
The list below shows who you have selected to be a Top Family Member (From 1-25)
User 1 User 2 User 3 User 4 User 5 User 6 User 7 User 8 User 9 User 10 User 11 User 12 User 13 User 14 User 15 User 16 User 17 User 18 User 19 User 20 User 21 User 22 User 23 User 24 User 25
This section shows who you click on for the Top Family side

The button below moves the member from the bottom of the list to the top
Move Up
This section shows a selected member from your family list

Username Here
profile_2
United States

Move Down
The button above moves the member from the top of the list to the bottom
This button saves the changes you made to your Top Family List
Save Your Top Family
*if the family member is not in the list, you can add them to your top family from their user page, using the 'Add as a top family' option.

Finally this button takes you back to your homepage

Back to your home page


If you have any further questions about this or any other player topics
Please feel free to leave a comment on this blog or private message either a Fubar Bouncer and they will try to help you the best they can.
For faster results you can also visit the Support Lounge and the staff/members will help you to the best of their abilities..


© This blog is subject to change at any given time

© This blog does have a copyright notice and cannot be copied unless given permission by its owner


Copyright© Manage Your Family™ ~ All Rights Reserved
Updated Blog: 07/04/2018 - 01:53 EST
Blog Designed/Moderated by: §tevens
click tracking
(How To) Manage Your Top Friends

Everyone who has a Family List on Fubar wants to pick and choose which member they want as their #1 choice as Top Family. Each member can utilize this feature and choose up to Twenty-Five members to be in their Top Family. Also each member can organize their Families to better show off other members.

This blog will give the following:
- Show How To Make A Member A Top Friend,
- Show A Live Look Of The Manage Top Friends Page.


Adding Member To Top Friends

To add a member to your Top Friends List you must first add that member to your Friends List.Once you have read this blog make sure to check out the blog titled (How To) Manage Your Family.

The below steps will show you how to make a member attain the top position who is already on your Friends List.

Open Your Desired Browser

open_browser

Direct Your Browser To Fubar.com & Locate The Login Area

fubar_website1

Once You Have Logged In Successfully Go To Your Friends Page

stevens_profile

Once You Are On Your Friends Page Locate
The Link Named Add As Top Friend And Click It

family_add

Once You Have Clicked The Add As Top Friend Link
The Page Will Re-Load To Your Top Friends Page
(As Shown Below)


Moving Member To Top Friend

Now that you have a better understanding of this area you will finally see what this feature will allow you to do,
whether it be to Add or Re-Arrange the prescribed list (25 maximum) to better suit who you want visible on your profile.

Below will be a Live Example of what the Moderate Friends Page looks like.

Below is the table area to rearrage your 25 Top Friends

to view this just click this Link

Manage your 25 Top Friends
This section shows a selected member from your friends list

Username Here
profile_1
United States

Remove as a Friend
The Button above removes the member from ur Friends List
0-50 of your Friends
The list below shows everyone on your friends list (up to 50 members max)
User 1 User 2 User 3 User 4 User 5 User 6 User 7 User 8 User 9 User 10 User 11 User 12 User 13 User 14 User 15 User 16 User 17 User 18 User 19 User 20 User 21 User 22 User 23 User 24 User 25 User 26 User 27 User 28 User 29 User 30 User 31 User 32 User 33 User 34 User 35 User 36 User 37 User 38 User 39 User 40 User 41 User 42 User 43 User 44 User 45 User 46 User 47 User 48 User 49 User 50
The button below adds the member to your top friends
Add To
Top Friends -->

<-- Remove From
Top Family
The Button above removes the member from ur Top Friends List
Top Family
The list below shows who you have selected to be a Top Friend (From 1-25)
User 1 User 2 User 3 User 4 User 5 User 6 User 7 User 8 User 9 User 10 User 11 User 12 User 13 User 14 User 15 User 16 User 17 User 18 User 19 User 20 User 21 User 22 User 23 User 24 User 25
This section shows who you click on for the Top Friend side

The button below moves the member from the bottom of the list to the top
Move Up
This section shows a selected member from your friends list

Username Here
profile_2
United States

Move Down
The button above moves the member from the top of the list to the bottom
This button saves the changes you made to your Top Friends List
Save Your Top Friends List
*if that friend is not in the list, you can add them to your top friends from their user page, using the 'Add as a top friend' option.

Finally this button takes you back to your homepage

Back to your home page


If you have any further questions about this or any other player topics
Please feel free to leave a comment on this blog or private message either a Fubar Bouncer and they will try to help you the best they can.
For faster results you can also visit the Support Lounge and the staff/members will help you to the best of their abilities..


© This blog is subject to change at any given time

© This blog does have a copyright notice and cannot be copied unless given permission by its owner


Copyright© Manage Your Family™ ~ All Rights Reserved
Updated Blog: 07/04/2018 - 02:04 EST
Blog Designed/Moderated by: §tevens
click tracking
(How To) Specifying Colors Within A WebPage

If you would like to specify colors within any web page, you must set Color Attributes. Attributes determine the appearance of a web page, such as background color, text colors and fonts.

To specify a specific color, you must use the hexadecimal color code within your HTML coding. The hexadecimal color codes can be used throughout the entire web page to specify all of the following:

  • Background Colors
  • Font Colors
  • Border Colors

To ensure your colors will be displayed to most Internet users as you had intended, you should always select your colors from the 216 web safe colors, as displayed in the 216 web safe color chart below.

When using colors within your HTML, you can also use the actual color "word" for basic colors such as black, white, red, green, blue and yellow.

Your color code might look something like this: BGCOLOR="RED"

ColorRedGreenBlueHexadecimal
Black000#000000
White255255255#FFFFFF
Red25500#FF0000
Green02550#00FF00
Blue00255#0000FF
Yellow2552550#FFFF00

To specify the background and text color of a web page, place the following color attributes, indicated in bold, within the <BODY> tag of your web page:

<BODY BGCOLOR="#FF0000" TEXT="#0000FF">

To specify link colors within a web page, place the following color attributes, indicated in bold, within the BODY tag of your web page:

<BODY LINK="#003399" VLINK="#0000CC" ALINK="#9966CC">

To specify the border color within an HTML table, place the following code within your TABLE code:

<TABLE align="center" style="border: 2px solid rgb(204,204,204);">

This is a Test Table to show the border

To specify the background color within a specific TABLE cell, place the following code, indicated in bold, within your TABLE code:

<TD style="border: 2px solid rgb(204,204,204);">Your Cell Text</TD>

Table Cell 1Table Cell 2

Edit the hexadecimal color codes indicated in red to suit your needs.

Although you can change the background color of your web page, it is highly recommended that you use the default background color of white and the default text color of black, as this is the easiest color options to read within a web browser.

In addition, it is highly recommended that you use the default link colors within your web pages, as these colors are what your visitors will be expecting. Changing the link colors may cause confusion.

Each color displayed within the color chart below contains the hexadecimal values and the RGB (Red, Green, Blue) Values. Select a color and copy & paste the hexadecimal value into your HTML document.

Example:

Hexadecimal Value - #FFFFFF  RGB Color Code - R=255 G=255 B=255

HTML 5 Update - Please Note with HTML 5 now enabled a fourth decimal code has been added to the list of the hexidecimal list. This is referred to as Alpha / Opacity (ex.rgba(0,0,0,1)). Below is the list of Opacity levels

Opacity Levels
0.00.10.20.30.40.50.60.70.80.91

216 Web Safe Color Chart
#FFFFFF

R=255
G=255
B=255
#FFFFCC

R=255
G=255
B=204
#FFFF99

R=255
G=255
B=153
#FFFF66

R=255
G=255
B=102
#FFFF33

R=255
G=255
B=51
#FFFF00

R=255
G=255
B=0
#FFCCFF

R=255
G=204
B=255
#FFCCCC

R=255
G=204
B=204
#FFCC99

R=255
G=204
B=153
#FFCC66

R=255
G=204
B=102
#FFCC33

R=255
G=204
B=51
#FFCC00

R=255
G=204
B=0
#FF99FF

R=255
G=153
B=255
#FF99CC

R=255
G=153
B=204
#FF9999

R=255
G=153
B=153
#FF9966

R=255
G=153
B=102
#FF9933

R=255
G=153
B=51
#FF9900

R=255
G=153
B=0
#FF66FF

R=255
G=102
B=255
#FF66CC

R=255
G=102
B=204
#FF6699

R=255
G=102
B=153
#FF6666

R=255
G=102
B=102
#FF6633

R=255
G=102
B=51
#FF6600

R=255
G=102
B=0
#FF33FF

R=255
G=51
B=255
#FF33CC

R=255
G=51
B=204
#FF3399

R=255
G=51
B=153
#FF3366

R=255
G=51
B=102
#FF3333

R=255
G=51
B=51
#FF3300

R=255
G=51
B=0
#FF00FF

R=255
G=0
B=255
#FF00CC

R=255
G=0
B=204
#FF0099

R=255
G=0
B=153
#FF0066

R=255
G=0
B=102
#FF0033

R=255
G=0
B=51
#FF0000

R=255
G=0
B=0
 
#CCFFFF

R=204
G=255
B=255
#CCFFCC

R=204
G=255
B=204
#CCFF99

R=204
G=255
B=153
#CCFF66

R=204
G=255
B=102
#CCFF33

R=204
G=255
B=51
#CCFF00

R=204
G=255
B=0
#CCCCFF

R=204
G=204
B=255
#CCCCCC

R=204
G=204
B=204
#CCCC99

R=204
G=204
B=153
#CCCC66

R=204
G=204
B=102
#CCCC33

R=204
G=204
B=51
#CCCC00

R=204
G=204
B=0
#CC99FF

R=204
G=153
B=255
#CC99CC

R=204
G=153
B=204
#CC9999

R=204
G=153
B=153
#CC9966

R=204
G=153
B=102
#CC9933

R=204
G=153
B=51
#CC9900

R=204
G=153
B=0
#CC66FF

R=204
G=102
B=255
#CC66CC

R=204
G=102
B=204
#CC6699

R=204
G=102
B=153
#CC6666

R=204
G=102
B=102
#CC6633

R=204
G=102
B=51
#CC6600

R=204
G=102
B=0
#CC33FF

R=204
G=51
B=255
#CC33CC

R=204
G=51
B=204
#CC3399

R=204
G=51
B=153
#CC3366

R=204
G=51
B=102
#CC3333

R=204
G=51
B=51
#CC3300

R=204
G=51
B=0
#CC00FF

R=204
G=0
B=255
#CC00CC

R=204
G=0
B=204
#CC0099

R=204
G=0
B=153
#CC0066

R=204
G=0
B=102
#CC0033

R=204
G=0
B=51
#CC0000

R=204
G=0
B=0
 
#99FFFF

R=153
G=255
B=255
#99FFCC

R=153
G=255
B=204
#99FF99

R=153
G=255
B=153
#99FF66

R=153
G=255
B=102
#99FF33

R=153
G=255
B=51
#99FF00

R=153
G=255
B=0
#99CCFF

R=153
G=204
B=255
#99CCCC

R=153
G=204
B=204
#99CC99

R=153
G=204
B=153
#99CC66

R=153
G=204
B=102
#99CC33

R=153
G=204
B=51
#99CC00

R=153
G=204
B=0
#9999FF

R=153
G=153
B=255
#9999CC

R=153
G=153
B=204
#999999

R=153
G=153
B=153
#999966

R=153
G=153
B=102
#999933

R=153
G=153
B=51
#999900

R=153
G=153
B=0
#9966FF

R=153
G=102
B=255
#9966CC

R=153
G=102
B=204
#996699

R=153
G=102
B=153
#996666

R=153
G=102
B=102
#996633

R=153
G=102
B=51
#996600

R=153
G=102
B=0
#9933FF

R=153
G=51
B=255
#9933CC

R=153
G=51
B=204
#993399

R=153
G=51
B=153
#993366

R=153
G=51
B=102
#993333

R=153
G=51
B=51
#993300

R=153
G=51
B=0
#9900FF

R=153
G=0
B=255
#9900CC

R=153
G=0
B=204
#990099

R=153
G=0
B=153
#990066

R=153
G=0
B=102
#990033

R=153
G=0
B=51
#990000

R=153
G=0
B=0
 
#66FFFF

R=102
G=255
B=255
#66FFCC

R=102
G=255
B=204
#66FF99

R=102
G=255
B=153
#66FF66

R=102
G=255
B=102
#66FF33

R=102
G=255
B=51
#66FF00

R=102
G=255
B=0
#66CCFF

R=102
G=204
B=255
#66CCCC

R=102
G=204
B=204
#66CC99

R=102
G=204
B=153
#66CC66

R=102
G=204
B=102
#66CC33

R=102
G=204
B=51
#66CC00

R=102
G=204
B=0
#6699FF

R=102
G=153
B=255
#6699CC

R=102
G=153
B=204
#669999

R=102
G=153
B=153
#669966

R=102
G=153
B=102
#669933

R=102
G=153
B=51
#669900

R=102
G=153
B=0
#6666FF

R=102
G=102
B=255
#6666CC

R=102
G=102
B=204
#666699

R=102
G=102
B=153
#666666

R=102
G=102
B=102
#666633

R=102
G=102
B=51
#666600

R=102
G=102
B=0
#6633FF

R=102
G=51
B=255
#6633CC

R=102
G=51
B=204
#663399

R=102
G=51
B=153
#663366

R=102
G=51
B=102
#663333

R=102
G=51
B=51
#663300

R=102
G=51
B=0
#6600FF

R=102
G=0
B=255
#6600CC

R=102
G=0
B=204
#660099

R=102
G=0
B=153
#660066

R=102
G=0
B=102
#660033

R=102
G=0
B=51
#660000

R=102
G=0
B=0
 
#33FFFF

R=51
G=255
B=255
#33FFCC

R=51
G=255
B=204
#33FF99

R=51
G=255
B=153
#33FF66

R=51
G=255
B=102
#33FF33

R=51
G=255
B=51
#33FF00

R=51
G=255
B=0
#33CCFF

R=51
G=204
B=255
#33CCCC

R=51
G=204
B=204
#33CC99

R=51
G=204
B=153
#33CC66

R=51
G=204
B=102
#33CC33

R=51
G=204
B=51
#33CC00

R=51
G=204
B=0
#3399FF

R=51
G=153
B=255
#3399CC

R=51
G=153
B=204
#339999

R=51
G=153
B=153
#339966

R=51
G=153
B=102
#339933

R=51
G=153
B=51
#339900

R=51
G=153
B=0
#3366FF

R=51
G=102
B=255
#3366CC

R=51
G=102
B=204
#336699

R=51
G=102
B=153
#336666

R=51
G=102
B=102
#336633

R=51
G=102
B=51
#336600

R=51
G=102
B=0
#3333FF

R=51
G=51
B=255
#3333CC

R=51
G=51
B=204
#333399

R=51
G=51
B=153
#333366

R=51
G=51
B=102
#333333

R=51
G=51
B=51
#333300

R=51
G=51
B=0
#3300FF

R=51
G=0
B=255
#3300CC

R=51
G=0
B=204
#330099

R=51
G=0
B=153
#330066

R=51
G=0
B=102
#330033

R=51
G=0
B=51
#330000

R=51
G=0
B=0
 
#00FFFF

R=0
G=255
B=255
#00FFCC

R=0
G=255
B=204
#00FF99

R=0
G=255
B=153
#00FF66

R=0
G=255
B=102
#00FF33

R=0
G=255
B=51
#00FF00

R=0
G=255
B=0
#00CCFF

R=0
G=204
B=255
#00CCCC

R=0
G=204
B=204
#00CC99

R=0
G=204
B=153
#00CC66

R=0
G=204
B=102
#00CC33

R=0
G=204
B=51
#00CC00

R=0
G=204
B=0
#0099FF

R=0
G=153
B=255
#0099CC

R=0
G=153
B=204
#009999

R=0
G=153
B=153
#009966

R=0
G=153
B=102
#009933

R=0
G=153
B=51
#009900

R=0
G=153
B=0
#0066FF

R=0
G=102
B=255
#0066CC

R=0
G=102
B=204
#006699

R=0
G=102
B=153
#006666

R=0
G=102
B=102
#006633

R=0
G=102
B=51
#006600

R=0
G=102
B=0
#0033FF

R=0
G=51
B=255
#0033CC

R=0
G=51
B=204
#003399

R=0
G=51
B=153
#003366

R=0
G=51
B=102
#003333

R=0
G=51
B=51
#003300

R=0
G=51
B=0
#0000FF

R=0
G=0
B=255
#0000CC

R=0
G=0
B=204
#000099

R=0
G=0
B=153
#000066

R=0
G=0
B=102
#000033

R=0
G=0
B=51
#000000

R=0
G=0
B=0

If you have any further questions about this topic
Please feel free to leave a comment on this blog or private message a Fubar Bouncer and they will try to help you the best they can.
For faster results you can also visit the Support Lounge and the staff/members will help you to the best of their abilities..


© This blog is subject to change at any given time

© This blog does have a copyright notice and cannot be copied unless given permission by its owner


Copyright© Specifying_Web_Colors™ ~ All Rights Reserved
Updated Blog: 07/08/2018 - 23:18 EST
Blog Designed by: Stevens
click tracking
(How To) Use Fubar's Tooltips / Chatbox

Fubar has always used hover-able menus (currently known as Tooltips) since the dawn of the first member (back when the site was first named LostCherry (ask members with an early user-number how LostCherry came about. There is three different types of Tooltips (Profile(Non-VIP/VIP) Tooltip, Profile(VIP+1) Tooltip and the Lounge Tooltip) on fubar and each Tooltip gives information that is sufficient for the member to use.

Its no secret Fubar.com is an always growing site.

Below is what the two traditional Profile Tooltips styles on Fubar will look like when you (the member) hover another members name. Some of the features have been disabled do to security risk (ie. Java script and Submit/Cancel Buttons). Since there is two types of profile tooltips I will try my best to showcase two different members.

Profile Tooltips

This is an example of what Agg's Tooltip will look like.

vip_icon.pngvip_420_50x36.pngvip_halloween_50x36.pngvip_smiley_sun.gif
Today's Rank:  1 ↑ / 10 ↓
Friends & Fans:  Friend # / Fan #
Achievement Pts:  Points #
Location:
Fame:
fame_meter_empty.pngfame_meter_blue_100.pngfame_meter_purple_100.pngfame_meter_orange_100.pngfame_meter_red_100.png
Buzz:
shots_100.png
sh*t faced!
icon_gender_female.pngmobile-icon
icon_salute2.pngtooltip_are_friends.jpg
Status: OMG Stevens is next to me :)
close

This is an example of what Stevens Tooltip looks like.

tooltip_online_tab.png
vip_plus_icon.gifvip_plus_crown.gifvip_plus_spin.gifvip_plus_saiyan.gifvip_plus_spider.gifvip_plus_bca.gif
Today's Rank:  1 ↑ / 10 ↓
Friends & Fans:  Friend # / Fan #
Achievement Pts:  Points #
Location:
Fame:
fame_meter_empty.pngfame_meter_blue_100.pngfame_meter_purple_100.pngfame_meter_orange_100.pngfame_meter_red_100.png
Buzz:
halloween_shot_100.png
sh*t faced!
icon_gender_male.pngmobile-icon
icon_salute2.pngtooltip_are_friends.jpg
Status: UGH Aggs is next to me :|
close

For members who decide to buy a VIP and get to experience the VIP+ benefits
get to choose some spiffy tooltip backgrounds identical to the ones shown below

fire_bottom_366x480.gifFire (default)rain_lightning_368x480.gifStormy vipplus_digital.gifMatrix vip_skullsmoke_bg.gifSkull & Smoke vip_bca_bg.gifBCA

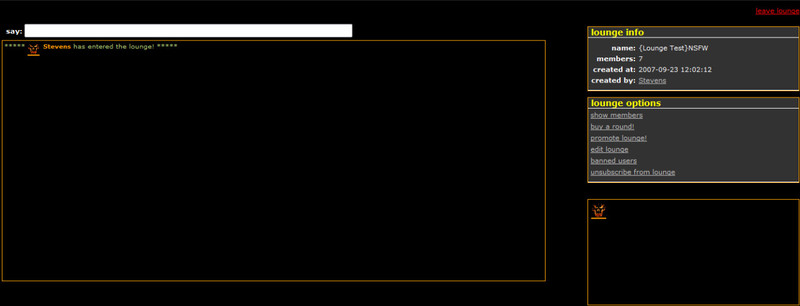
The tooltip below is what it will look like when members go into lounges.In the example below I have included
what Lounge Staff, Co-Owner's and Lounge Owner's will see when they view a members Lounge Tooltip.

Lounge Tooltip

This is an example of what Stevens's Lounge Tooltip will look like.

StevensSave the Tata’svip_plus_saiyan.gif
tn_3686724774.jpg
Lounge Staff
pictures (Photo #)
Buzz:
halloween_shot_100.png
sh*t faced!
Level:  150
Rating:  11 (∞)
Fans:  # of Fans
Gender:  Gender, Age
Location:  Jacksonville, FL
icon_salute2.pngtooltip_are_friends.jpg
Status: Need help come ask me in the Support Lounge
Bling:
my favorite bling!
St. Patrick's Skull

 
Cheers!
Fyretygres...
fubar Dog Tag
SCRAPPER
visit profilegive a giftbling them!tooltip_badge_2006.gifpokesend private messageblock member
lounge owner options (Figure 1-A)

lounge owner options (Figure 1-B)

lounge staff options (Figure 1-C)


Below is a mock up of the Extended ChatBox Webpage Fubar is using and a conversation with Scrapper with a fubar member. IN this its given general idea of what the Shoutbox window is and how to access it. Many Members don't know there is a webpage for the shoutbox and to access the page all you have to do is hover the users picture (if on shoutbox click name) and click the little image that looks like ⇒ shout_img ⇐. Once this image is clicked it will begin loading an External window that will reveal what is below but without the words (unless you've shouted the member before). If you have any questions or comments you can shoutbox or message anyone of the Fubar Bouncers and they will assist youi with any of your questions

SCRAPPEROnline
vip_plus_crown.gif
tn_2137719421.jpg
Buzz:
halloween_shot_100.png
sh*t faced!
Level:255
Gender: Male, ?
Location:
Status:Respect to the vets!
SCRAPPER: Can I speak to you for a sec?
Fubar_Member: Whats Up Dude??
SCRAPPER: Mind if I bug you for a second and explain what the Tooltip(Chatbox) is?
Fubar_Member: Sure
SCRAPPER: Well let me start by saying when a member first signs up for Fubar they get a welcome message from babyjesus welcoming them to the site.
SCRAPPER: The Shoutbox is used as a Private Messenger(IM CHAT) between two members. It is better to use the chatbox and talk to someone than it would be to send them a private message and not be answered for days upon days.
Fubar_Member: Can you explain how a member uses the Chatbox??
SCRAPPER: Sure. All a member has to do is go find someone they wanna talk to privately they can either hover their mouse pointer over a members name / primary_image, when the tooltip(extra_window) loads they just have to type in the input box on the bottom and click send / hit the enter/return key and that shout send their message. or they can click the image that looks like a megaphone and that will open a seperate larger window.
SCRAPPER: Also if they want to have a direct shout page so they don't have to keep clicking the users name to open a tooltip a member can click on the image that looks like a megaphone in the pertaining members tooltip and that will open a seperate larger window(as shown here).
Fubar_Member: In your view which one would be better the Shoutbox or The Private Message System??
SCRAPPER: Both are great features.. The only downside to them both is when the chatbox gets a significant amount of members chatting the content tends to scroll out of the box, but to get the message back all they have to do is find the member again and when the tooltip shows click the megaphone. As for private message that feature is mainly used for long term use. Most members will get their previous chat back (unless they or the other member clears their shoutbox). The Private Message System has a capacity of 25 messages per page, after the 25 message it creates a new page with the same function.
Fubar_Member: How many Chatboxes are there??.
SCRAPPER: There is two currently in commission. One is the little fixedtipdiv(commonly called Tooltip) on every webpage while the other is an external window(as shown here).
SCRAPPER: Well Hope this has been insighting
Fubar_Member: Yes it has Thankyou
SCRAPPER: Have a good day..
Welcome to fubar Chat! To start chatting with SCRAPPER type your message here.

If you have any further questions about the shoutbox or how to use it properly
Please feel free to leave a comment on this blog or private message a Fubar Bouncer and they will try to help you the best they can.
For faster results you can also visit the Support Lounge and the staff/members will help you to the best of their abilities..


Copyright© Tooltip_Revision™ ~ All Rights Reserved
Updated Blog: 11/13/2018 - 03:50 EST
Tooltip/Chat_Box_Page Hosted by: fubar.com
Blog Designed/Moderated by: §tevens³
click tracking
(How To) Create Customized Bulletins

Lets face it everyone creates Bulletins (whether it be Fubar Admin, Fubar Bouncers, Advanced Users, Lounge Owners, etc...). We each use Bulletins in our own way. For those that don't know what a Bulletin is this blog will explain as well as show you some of the background information behind a Customized Bulletin.

This blog will be referenced by my two blogs titled (How To) Coding 101 & (How To) Specify Colors Within A Webpage. Bulletins are mainly used to broadcast Fubar Promotions, Member Concerns or Lounge Invites/Special DJ Players. Bulletins are also classified as Mini-Blogs which allows members to spread the word on a topic of their choosing. Below I will list examples of (How To) Create a Customized Bulletin using HTML (Hyper Text Markup Language).


Coding A Bulletin 101

Basically we are going to begin with the code portion of a bulletin and show what can be used within.

<div> - This is the first structure tag that will begin the Outline for the Bulletin.
<table> - This is the secondary structure tag that create a <table> for the Bulletin.
<tr> - This is used within the <table> to conform to the W3C formats of how a Table is structured.
<td> - This is the Table Decoration. It is where all the information you want to place goes.
<p> - This is called a Paragraph tag. This is used to easily create paragraphs within the <table>s Table Decoration Area.

Now that you know which components can be used within a bulletin you can now move on to what the code will look like and I will also show a live preview of this code in every day fashion.


Code Preview

There will be two examples of coding the first will show how the code is structured and the second will either be a screenshot of a bulletin or it will be a Live Preview of a bulletin page.

<div style="width: 600px; border: 2px solid rgb(248,248,255);">
 <table align="center" style="background-image: url('URL to Image Here'); background-position: center;" summary="Customized Bulletin">
  <tr>
   <td style="">
    <div style="">
     <table align="center">
      <tr>
       <td style="font-weight: bold; font-size: 14pt; color: rgb(248,248,255);">
        <p style="">Editable Text Here</p>
        <p style="">
         <img src="URL To Image Here" border="0" alt="Sample Bulletin IMG">
        </p>
       </td>
      </tr>
     </table>
    </div>
   </td>
  </tr>
 </table>
</div>

Live Preview

This is a preview of what the bulletin will look like when you preview the coding as well as the final result of when it is posted..

fubar Bulletin!MAKE STICKY!
Volunteer Coder Homepage
Online
United States
  
Subject:Volunteer Coder Bulletin Test
     Date:December 19, 2012, 00:00 am
 

This is a live example of a bulletin

That shows you how it is implemented to every member.

More information can be found
by messaging the owner of this blog..

NOTE: If you post content that is offensive, adult, or NSFW (Not Safe For Work), your account will be deleted.


In Conclusion, As you can see above creating a Bulletin is easy and finding its components is even easier. There is many different ways one can create and skin a Bulletin, but this is a much cleaner version that people can use and implement on their own time. Bulletins can either have comments Enabled or Disabled on them to either let their friends comment on the topic or just to let others repost their work to broadcast it to their Friends List as well. The more a Bulletin is reposted means the more it is going around to others to see what you have created (whether it be for a Lounge, Customized Profile Skin or just a plain Bulletin with some simple word[No HTML])..


If you have any further questions, comments, concerns or anything I can add / change to this blog to give a better sense based on this topic
Please feel free to leave a comment on this blog or private message a Fubar Bouncer and they will try to help you the best they can.
For faster results you can also visit the Support Lounge and the staff/members will help you to the best of their abilities as well..


© This blog is subject to change at any given time

© This blog does have a copyright notice and cannot be copied unless given permission by its owner


Copyright© Create Bulletins™ ~ All Rights Reserved
Updated Blog: 06/30/2018 - 23:29 EST
Blog Designed/Moderated by: §tevens
click tracking
(How To) Create A Profile Skin

Now-a-days everyone is online (whether it be Facebook, Twitter or Fubar) and each website (aka. Social Network) has their own style Profile Skin. While Facebook & Twitter have limited to no User Input on Custom Profile Skins Fubar allows its members to customize a limited portion of their Profile Skin. Below I will demonstrate (with limited Screenshots) of (How To) Create A Profile Skin using basic (easy) CSS (Cascading Style Sheets) Codes.

This blog will be Part 1 of a 2 part blog. The next part will list what some of the basic skin functions do.

(How To) Profile Skin Breakdown


The first thing you'll need to do is go directly to your Homepage (whether it be Old Hotness, Old Normal, Old & Janky or fsB) and go to the Main Menu (listed in Figure 1-1) and click on header_arrow.gifMy then Skins (for those on the fsB homepage click this link to go to the My Skins page or change your Homepage Style via your Settings Page.

When the page reloads it will direct you to your skins page (as shown in Figure 1-2) where a skin can either be Browsed or Created. For those who don't fully understand CSS it's recommended you Browse Skins rather than create one so you don't screw up your own.

[Figure 1-2: MySkins Page]


create a skin!   browse skins!

hint: if you activate multiple skins, one will be selected at random each time someone checks out your profile!


no skins configured.

To create your own skin click the Create Skin link. When the page reloads copy the basic skin style and place it into the textarea (as shown in Figure 1-3) on the create skin page add a name to the new skin and click the Submit button.

[Figure 1-3: Create Skin Page]


skin hints


the skin form to the right contains the default fubar user skin.

modify the values to your liking or cut & paste your own page style code!

note: until we have the time to make a better skin editor, this is best left to advanced or tech savy members. if you don't know what you're doing, simply browse all the existing skins and rip one!

.


enter skin below
name:

#userpagecontentstyle {
  background-image: url('URL to image here');
  background-attachment: fixed;
  background-position: 0% 0%;
  background-repeat: no-repeat;
  background-size: 100%;
}

#userpagecontentstyle div#userprofile_headerbar {
  margin:0;
  padding:0;
  width: 100%;
  height: 0px;
  }

#userpagecontentstyle #activated_bling_panel .img_container a {
  display: block;
  margin: 0 auto;
  width: 50px;
  }

#userpagecontentstyle #bling_panel .img_container a {
  display: block;
  margin: 0 auto;
  width: 50px;
  }

#userpagecontentstyle #activated_bling_panel .img_container {
  position: relative;
  }

#userpagecontentstyle #bling_panel .img_container {
  position: relative;
  }

#userpagecontentstyle #activated_bling_panel .img_container img.special_ability_img {
  height: 10px;
  width: 10px;
  float: left;
  margin-left: 2px;
   99;
  left: 0px;
  position: relative;
  }

#userpagecontentstyle #bling_panel .img_container img.special_ability_img {
  height: 10px;
  width: 10px;
  float: left;
  margin-left: 2px;
   99;
  left: 0px;
  position: relative;
  }

#userpagecontentstyle #activated_bling_panel .img_container .fromline {
  white-space: nowrap;
  display: block;
  text-align: center;
  width: 58px;
  padding: 0;
  position: relative;
  }

#userpagecontentstyle #bling_panel .img_container .fromline {
  white-space: nowrap;
  display: block;
  text-align: center;
  width: 58px;
  padding: 0;
  position: relative;
  }

#userpagecontentstyle #lounge_panel {
  min-height: 45px;
  }

#userpagecontentstyle #blog_panel {
  min-height: 45px;
  }

#userpagecontentstyle .news_feed {
  background-color: #000;
  }

#userpagecontentstyle #status_box {
  background-color: #000;
  }

#userpagecontentstyle .profile_container a {
  color: #5ED5D5;
  }

#userpagecontentstyle .profile_display_name {
  font-size: 30px;
  }

#userpagecontentstyle #profile_box {
  border: 1px solid #333333;
  background-color: #000;
  }

#userpagecontentstyle #profile_box .stats {
  background-color: #000;
  }

#userpagecontentstyle #profile_box .stats_bg {
  background: url(/imgs/user/stats_bg.png) top right repeat-y;
  background-color: #000;
  }

#userpagecontentstyle #main_achievement .achievements {
  background: url(/imgs/user/achievements_bg.png) repeat-y scroll right top #000000;
  }

#userpagecontentstyle .achievement_desc {
  font-weight: bold;
  }

#userpagecontentstyle .stat_col .title {
  font-size: 9px;
  font-family: Arial,Verdana,sans-serif;
  }

#userpagecontentstyle .stat_title {
  font-weight: bold;
  }

#userpagecontentstyle #buzz_meter .buzz_percent {
  font-size: 9px;
  font-weight: bold;
  }

#userpagecontentstyle #level_meter .level_percent {
  font-size: 9px;
  font-weight: bold;
  }

#userpagecontentstyle #level_meter .user_level_top .current_level {
  font-size: 11px;
  }

#userpagecontentstyle #level_meter .user_level_top .next_level {
  font-size: 11px;
  }

#userpagecontentstyle #profile_box #main_achievement .details {
  background: url(/imgs/user/achievements_bg.png) repeat-y scroll right top #434242;
  }

#userpagecontentstyle #profile_box #main_achievement .details p {
  font-size: 10px;
  }

#userpagecontentstyle #profile_box #main_achievement .details .title {
  font-size: 11px;
  }

#userpagecontentstyle #fumafia {
  border: none;
  }

#userpagecontentstyle .fumafia_logo {
  margin: 0;
  }

#userpagecontentstyle .fumafia_logo img {
  height: 15px;
  }

#userpagecontentstyle .fumafia_info {
  text-align: left;
  }

#userpagecontentstyle .fumafia_info a {
  color: #fff;
  }

#userpagecontentstyle .fumafia_turf {
  width: 15px;
  }

#userpagecontentstyle .fumafia_turf img {
  width: 15px;
  }

#userpagecontentstyle .bling_fav_rank {
  -border-radius: 0 0 0 3px;
  -webkit-border-radius: 0 0 0 3px;
  -moz-border-radius: 0 0 0 3px;
  background: url(/imgs/user/tabs_bg.png) repeat scroll 4px -14px transparent;
  border-color: #444444;
  border-style: solid;
  border-width: 0 0 1px 1px;
  color: #DDDDDD;
  font-size: 10px;
  height: 14px;
  line-height: 12px;
  opacity: 1;
  padding-top: 0;
  junk;
  right: 0;
  top: 0;
  width: 16px;
   99;
  }

#userpagecontentstyle .friendfam_fav_rank {
  -border-radius: 0 0 0 3px;
  -webkit-border-radius: 0 0 0 3px;
  -moz-border-radius: 0 0 0 3px;
  background: url(/imgs/user/tabs_bg.png) repeat scroll 4px -14px transparent;
  border-color: #444444;
  border-style: solid;
  border-width: 0 0 1px 1px;
  color: #DDDDDD;
  font-size: 10px;
  height: 14px;
  line-height: 12px;
  opacity: 1;
  padding-top: 0;
  junk;
  right: 0;
  top: 0;
  width: 16px;
   99;
  }

#userpagecontentstyle ul.text_entry_list li {
  margin-bottom: 5px;
  }

#userpagecontentstyle ul.text_entry_list li a {
  font-weight: bold;
  }

#userpagecontentstyle #my_box .main {
  background-color: #000;
  }

#userpagecontentstyle #my_box .section {
  border-bottom: 1px solid #333;
  }

#userpagecontentstyle #my_box .section .show_user_demo {
  font-size: 11px;
  }

#userpagecontentstyle #my_box .section.last{
   margin:0;
   border-bottom:0px;
  }

#userpagecontentstyle .section_title {
  font-size: 12px;
  font-weight: bold;
  }

#userpagecontentstyle #left_nav {
  background-color:#000;
  border:1px solid #333;
  padding: 10px 13px;
  }

#userpagecontentstyle #left_nav ul li a {
  font-size: 13px;
  font-weight: bold;
  cursor: pointer;
  }

#userpagecontentstyle .left_sub_nav {
  margin-left: 15px;
  }

#userpagecontentstyle .left_sub_nav li a {
  font-weight: normal;
  color: #2a8f8f;
  cursor: pointer;
  }

#userpagecontentstyle .tabs li{
  background: url(/imgs/user/tabs_bg.png) repeat-x scroll 0 -98px #000000;
  float: left;
  font-size: 11px;
  font-weight: bold;
  margin-right: 2px;
  min-width: 89px;
  padding: 7px 10px;
  text-align: center;
   border-radius:4px 4px 0 0;
  -moz-border-radius:4px 4px 0 0;
  -webkit-border-radius:4px 4px 0 0;
  text-align:center;
  }

#userpagecontentstyle .tabs li.on{
  background: #000 url(/imgs/user/tabs_bg.png) 0 -8px repeat-x;
  }

#userpagecontentstyle .tabs li a {
  color: #fff;
  }

#userpagecontentstyle #rater .message_text {
  color: #888;
  }

#userpagecontentstyle #status_box .title {
  font-size: 20px;
  font-weight: bold;
  }

#userpagecontentstyle #status_box .user_status_wrapper {
  background-color: #000;
  }

#userpagecontentstyle .news_feed ul.user_list li.last {
  border: 0;
  }

#userpagecontentstyle .news_feed ul.user_list.mini {
  background-color: #191919;
  }

#userpagecontentstyle .news_feed ul.user_list.mini li {
  border-color: #000;
  }

#userpagecontentstyle .news_feed ul.user_list.mini .nub {
  background: url(/imgs/simple_home/nub_dark.png) no-repeat scroll 17px 0 transparent;
  border: 0 none;
  height: 5px;
  left: 17px;
  junk;
  top: -5px;
  width: 5px;
  }

#userpagecontentstyle .news_feed .fb_module_header h2.title {
  background: url(/imgs/simple_home/news_icon.png) no-repeat scroll 0 1px transparent;
  font-size: 20px;
  }

#userpagecontentstyle .simple_status_current {
  font-size: 12px;
  }

#userpagecontentstyle .simple_status_current_title {
  color: #5ed5d5;
  font-weight: bold;
  }

#userpagecontentstyle .simple_status_current_text {
  font-style: italic;
  color: #aaaaaa;
  font-size: 11px;
  }

#userpagecontentstyle .simple_status_current_clear {
  font-size: 11px;
  }

#userpagecontentstyle .stream_message {
  font-size: 13px;
  }

#userpagecontentstyle .stream_source {
  font-size: 10px;
  color: #777;
  }

After you have clicked the Save Skin button the page will be directed to a Saved Skin Page (shown in Figure 1-4), once loaded you'll then be redirected back to your MySkin Page (shown in Figure 1-5) with your new skin loaded.

[Figure 1-4: Skin Has Been Saved]


successfully created new skin 'Skin Name Here' (?????) and added to your skin list!


[Figure 1-5: Modified MySkin Page]


create a skin!   browse skins!

hint: if you activate multiple skins, one will be selected at random each time someone checks out your profile!


my skins
activenameripscreatorcreate date 
YESNOCustom Made SkinmeDec, 20 2010preview skin  |  edit skin   |   delete skin

As you can see in Figure 1-5 there is a tab that says Active (by default this will say NO). All you have to do to activate your new skin is to change that option to YES. The page will reload and your new skin will be active (shown in Figure 1-6 (This will be a screenshot)).

[Figure 1-6: Activated Profile Skin]
Skin Preview Image

Follow the above steps and you will have created your own Basic Skin.


If you have any further questions about this or any other profile skin topics
Please feel free to leave a comment on this blog or private message a Fubar Bouncer and they will try to help you the best they can.
For faster results you can also visit the Support Lounge and the staff/members will help you to the best of their abilities..


© This blog is subject to change at any given time

© This blog does have a copyright notice and cannot be copied unless given permission by its owner


Copyright© Creating Profile Skins™ ~ All Rights Reserved
Updated Blog: 06/30/2018 - 23:35 EST
Blog Designed/Moderated by: §tevens
click tracking
(How To) Different User Colors

Its no suprise Fubar has different colors for the fu-member community. This different style color scheme is shown below and as follows:

Color Schemes
  1. Blue: This member has VIP access and has selected this color.
  2. Bolded Gray: This member has verified his/her e-mail, but does not yet have an approved salute photo.
    (This used to indicate a member that has reached level 20.)
  3. Cyan: This member is either a Band Member (Level 95)
  4. Dark Blue: This member has reached Fubar's current top level (Level 70) and has a VIP
  5. Darker Blue: This member has become Fubar's top achiever in achievements.
  6. Dark Bolded Gray: This member is a vip member with no color but has a bolded look.
  7. Dark Green: This member is new, and has been here for fewer than 8 days.
  8. Dark Red: This member has the most everything fubar can calculate both male and female.
  9. Lime Green: This member is Fubar's Most Liked Member.
  10. Orange: This member is a Fubar Bouncer (level 150).
  11. Pink: This member has VIP access and has selected this color.
  12. Purple: This member has been the most active member for the previous day.
  13. Red: This member is a Top 10 user, based on rates, comments, number of fans, and other factors.
  14. SeaGreen: This member is level 200 or higher, and usually works for the site as an admin in some way.
  15. Unbolded Gray: This member has been here for more than 8 days, but has yet to verify his/her e-mail.
  16. White: This member has an approved salute photo.
  17. Yellow: This member has reached the highest level fubar has to offer.
Status Icons
Fubar_ImgAngelFubar_ImgBalloonsFubar_ImgBirthday CakeFubar_ImgBlazingFubar_ImgBlue EyeFubar_ImgBlue Skull
Fubar_ImgBombFubar_ImgBraFubar_ImgBrown EyeFubar_ImgBummedFubar_ImgCashFubar_ImgCheers
Fubar_ImgCoffeeFubar_ImgCuffsFubar_ImgEvilFubar_ImgExcitedFubar_ImgFlexingFubar_ImgFootball
Fubar_ImgFoxyFubar_ImgGagFubar_ImgGoofyFubar_ImgGreen EyeFubar_ImgGRRRFubar_ImgHeadphones
Fubar_ImgHeartbrokenFubar_ImgHeelsFubar_ImgHot ChiliFubar_ImgHot DogFubar_ImgHung_OverFubar_ImgIn Love
Fubar_ImgLigerFubar_ImgLipsFubar_ImgMoney SackFubar_ImgMoonshineFubar_ImgNaughtyFubar_ImgNinja
Fubar_ImgOfflineFubar_ImgOn FubarFubar_ImgOnlineFubar_ImgParty TimeFubar_ImgPassed OutFubar_ImgPeace
Fubar_ImgPhoneFubar_ImgPink SkullFubar_ImgPlaying fuMafiaFubar_ImgPokeballFubar_ImgRed EyesFubar_ImgSave Tata's
Fubar_ImgShadesFubar_ImgSmokingFubar_ImgShyFubar_ImgSickFubar_ImgStepped AwayFubar_ImgStuffing My Face
Fubar_ImgThe FingerFubar_ImgTrollFubar_ImgTrying to WorkFubar_ImgYogaFubar_ImgZZZ
Special Ability Icons
Fubar_ImgAbility StoneFubar_ImgAuto 11'sFubar_ImgBig BangFubar_ImgBoomerangFubar_ImgCherryBombFubar_ImgDouble Points
Fubar_ImgFamplifierFubar_ImgGod ModeFubar_ImgLikenadoFubar_ImgLikeasaurusFubar_ImgMake It RainFubar_ImgMega Polisher
Fubar_ImgNight StarFubar_ImgPimp HandFubar_ImgPimp ShieldFubar_ImgRockstar
Exotic Icons
Fubar_ImgBCA BlingFubar_ImgBig RedFubar_ImgfuBix CubeFubar_ImgFUNicornFubar_ImgfuPonyFubar_ImgGolden Skull
Fubar_ImgGolden WidowFubar_ImgLiving DeadFubar_ImgLost CherryFubar_ImgSticky IckyFubar_ImgTimeless ButterflyFubar_ImgTop Level
Emoticons
fubar_emote_img
:s
fubar_emote_img
:-S
fubar_emote_img
:-s
fubar_emote_img
:p
fubar_emote_img
:-p
fubar_emote_img
:P
fubar_emote_img
:-P
fubar_emote_img
8-P
fubar_emote_img
8-p
fubar_emote_img
X(
fubar_emote_img
:(
fubar_emote_img
:)
fubar_emote_img
:-(
fubar_emote_img
:-o
fubar_emote_img
:-O
fubar_emote_img
:O
fubar_emote_img
:o
fubar_emote_img
X)
fubar_emote_img
:-)
fubar_emote_img
=)
fubar_emote_img
=D
fubar_emote_img
:D
fubar_emote_img
:-D
fubar_emote_img
:@
fubar_emote_img
:-@
fubar_emote_img
(B)
fubar_emote_img
(b)
fubar_emote_img
(D)
fubar_emote_img
(d)
fubar_emote_img
(Y)
fubar_emote_img
(y)
fubar_emote_img
(N)
fubar_emote_img
(n)
fubar_emote_img
(50)
fubar_emote_img
(51)
fubar_emote_img
(52)
fubar_emote_img
(53)
fubar_emote_img
(54)
fubar_emote_img
(55)
fubar_emote_img
(56)
fubar_emote_img
(57)
fubar_emote_img
(58)
fubar_emote_img
(59)
fubar_emote_img
(60)
fubar_emote_img
(61)
fubar_emote_img
(62)
fubar_emote_img
(63)
fubar_emote_img
;)
fubar_emote_img
(z)
fubar_emote_img
(sk)
fubar_emote_img
(s)
fubar_emote_img
(a)
fubar_emote_img
(e)
fubar_emote_img
(sa)
fubar_emote_img
(al)
fubar_emote_img
(bh)
fubar_emote_img
(h)
fubar_emote_img
(r)
fubar_emote_img
(fu)
fubar_emote_img
^_^
Copyright© Different_User_Colors™ ~ All Rights Reserved
Updated Blog: 07/08/2018 - 23:36 EST
Blog Re-Written by: §tε_v_εns³
Blog Originally Designed by: OWL
click tracking
last post
2 years ago
posts
36
views
216,340
can view
everyone
can comment
everyone
atom/rss

followers

522051  
Sabia  
kini  
Pain  
Plato  
StrivingTDS  Onlinefingers crossed .....
Klonopin Kisses  Stepped awayCOME LOVE ON MY FAMILY!! 1ST RESET XO
NbN  
DR Coo  
Alexa  
MFKN TexasHoney  In loveIm off to lose myself in fu...never know what I might do
Damitt  
Gypsy  
Keres  
Anomoly  NinjaFubar is hosting a LikeFest Saturday, May 11th If you wa...
MD  
Mr Salt fm2 KotaBlu  EvilYeahhh, I could hide in the eye of the storm and never b...
HDxx  
JBAD  
Aryes  
Bee  
zyk  
Mooney  
SALT  
Joy  
JB  
CALI  
Kay  
Jack  
Neil  
geno71  
skydaddy  OnlineWhen someone tells you that they're lonely...
Ashafrassh  FoxyIt’s MAY my friends, and that means my schedule is pac...
Autumn Silvermoon DNO  BlazingI hope you have a great Wednesday!! ❤🎄 My computer,...&&

other blogs by this author

 1 year ago
Fu-Pastor_Blog
official fubar blogs
 8 years ago
fubar news by babyjesus  
 13 years ago
fubar.com ideas! by babyjesus  
 10 years ago
fubar'd Official Wishli... by SCRAPPER  
 11 years ago
Word of Esix by esixfiddy  

discover blogs on fubar

blog.php' rendered in 0.5311 seconds on machine '175'.