Have you ever wondered "How Does One Capture The Screen On Their Moniter??". On every Standard Keyboard there is a "Print Screen" function commonly called [PrtScrn], in the operating system that copies the contents of the Entire Screen or just the Active Window to the clipboard, which can then be pasted into a graphics application to print or upload to a image hosting site like Imgur. Here is an example of what a Standard Keyboard looks like. Below will be some steps on Screen Capturing: - (How To: Capture The Entire Screen) ~ Windows Edition
- Press the Print Screen key on your keyboard. It may be labeled [PrtScn].
- Open an image editing program, such as Microsoft Paint.
- Press the Ctrl Key and the V key once the Image Program is open
Please Note: This will capture the current Screen Resolution your moniter supports. - Edit the Image to how you see fit.
- Once your done editing go to the File Menu and choose Save As.
- Navigate to the folder where you want to save the image.
- Type a file name for the image.
- Select a file type(Preferrably PNG[Portable Network Graphic]).
- Click the Save button.
- (How To: Capture The Entire Screen) ~ Macintosh Edition
- To capture the entire desktop, press Command-Shift-3.
~ The screen shot will be automatically saved as a PNG file on your desktop. - To copy the entire desktop, press Command-Control-Shift-3.
~ The screen shot will be placed on your clipboard for you to paste into another program. - To capture a portion of the desktop, press Command-Shift-4.
~ A cross-hair cursor will appear and you can click and drag to select the area you wish to capture.
~ When you release the mouse button, the screen shot will be automatically saved as a PNG file on your desktop.
~ (The file is saved as PDF in Mac OS 10.3 and earlier.) - To capture a specific application window, press Command-Shift-4, then press the Spacebar.
~ The cursor will change to a camera, and you can move it around the screen.
~ As you move the cursor over an application window, the window will be highlighted.
~ The entire window does not need to be visible for you to capture it.
~ When you have the cursor over a window you want to capture,
just click the mouse button and the screen shot will be saved as a PNG file on your desktop.
~ (The file is saved as PDF in Mac OS 10.3 and earlier.) - Add Control to the two shortcuts above to place the screen shot on the clipboard instead of saving it to the desktop.
- Another method on Mac OS X systems is by using the bundled Apple utility, Grab, located in the Applications > Utilities folder.
~ Grab is useful if you need to include a cursor or a menu in your screen shot,
or if you want to save your screen shot to TIFF format.
~ To include a cursor, first go to Grab Preferences and select the cursor icon you wish to have in your screen shot.
~ To capture the screen with Grab, run Grab, then choose of the capture modes from the "Capture" menu:
- Selection
- Window
- Screen
- Timed Screen. - When you choose the Selection mode in Grab, you can capture a specific region of the screen by dragging around it.
~ Grab will display a tooltip showing the size of the region you have selected and the screen shot
will open in a window when you release the mouse button.
~ The cursor will not be included. - When you choose the Window mode in Grab, an instruction window will appear asking you to select the window
you wish to capture, then click the "Choose Window" button.
~ When you click the button, the instructions will disappear and the window you click ill be captured,
including the mouse cursor at the position where you click(if a cursor was selected in Preferences). - When you choose the Screen mode in Grab, an instruction window will appear asking you to
click the screen when you are ready to capture.
~ The mouse cursor will be included in your screen shot at the position where you click
(if a cursor was selected in Preferences). - When you choose the Timed Screen mode in Grab, an instruction window will appear,
allowing you to prepare your screen for capture.
~ When you are ready, press the "Start Timer" button and you will have ten seconds before the screen is captured.
~ This allows you to open menus and sub-menus, if necessary. After ten seconds the entire screen will be captured.
The mouse cursor will be included in your screen shot if a cursor was selected in Preferences.
- The content for Macintosh Systems was found on Graphicsoft.com
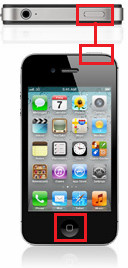
Screen Capturing On Mobile Devices Apple iPhone(iOS): This just may be iPhone 101 for many members but all the while Apple has pretty much snuck a New Feature into their 2.0 Firmware Update. This feature allows everyone to capture a screen on the iPhone with just the touch of two buttons. Follow the 5 Steps below to capture a screen using Apple's iPhone:
Android(Google): It took me getting an actual Android based phone to figure out how to get a screenshot from the hot keys (like iPhone has). I found taking screenshots of the device was as simple as pressing (and holding for three seconds) the Sleep button and the Volume Down buttons together, and the current screen got saved under what is known as the phones Gallery. Follow the 5 Steps below to capture a Mobile Screenshot on an Andriod Device: - Step 1: Locate The Sleep Button and the Volume Down Button (Image Shown below)

- Step 2: Go to the area in which you want to capture (ex. image, website, note, etc...)
- Step 3: Press & Hold (For Three Seconds) both the Sleep Button and the Volume Down Button at the same time (You should see a flash occur and hear a shutter sound)
- Step 4: Go to your phones Gallery and locate the image you just captured(Image Examples Shown Below)
Image A
 | Image B
 | Image C
 | Image D
 |
- Step 5: Upload the image to a different App (Facebook, Photobucket, etc..)
BlackBerry(WebOS): 
Courtesy: BlackBerry.com
Windows Phone: Windows based phones use a different approach to taking a screenshot and below is how to do it (with minimal images unfortunately) and the images that are shot is uploaded to the Photos Gallery as well as to your SkyDrive account. Follow the 4 Steps below to capture a Mobile Screenshot on an Windows Device: - Step 1: Press the Power Key and the Start Key at the same time. (Image Shown below)
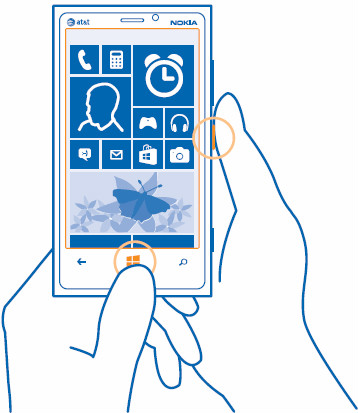
- Step 2: Locate The Photos App On Your Phone.
- Step 3: Locate The Screenshots Folder Within Your Photos App.
- Step 4: Tap & Hold The Image To Share It With Everyone.
In Conclusion: - There is also many different online screen capture programs (Also Screen Capture Apps)(like PrntScr). These programs are just like the paragraphs mentioned above and each works a different way. Make sure when you download a screen capture program or application the program is compatible with your system or mobile device.
If you have any further questions about how to set up a mobile address or upload images
Please feel free to private message a Fubar Bouncer and they will try to help you the best they can,
For faster results you can also visit the Support Lounge and the staff/members will help you to the best of their abilities.. |