Over 16,553,293 people are on fubar.
What are you waiting for?
This s a quick blog being done to show someone how to link photos in blogs.
While I have another blog in this blog folder showing how to link photos. That is more so for your profile page, and other websites that use HTML well here goes, should be rather easy and straight forward.
First post the photo you wish to be used as the link.
I am running under the assumption you already know how to do this, if you don't then CLICK HERE!
Okay once you have the photo in the blog, simply click on the photo once.
And then click the “link” icon, it looks like this 
Once you click that, this menu will come up.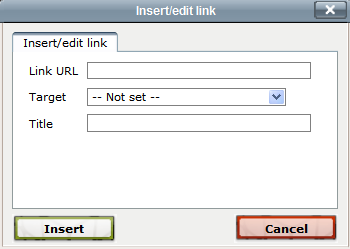
Remember to put in the whole URL in the link URL box, including the http://whatever.come/net/org depending on what you are linking to
Depending on the browser you have you may or may not have to put www.. I use Firefox and when I put http://www... I get an error and thus it will only work if I put http://address.com. Some browsers make you put the http://www.address.com.
Okay after that you may decide on the target.
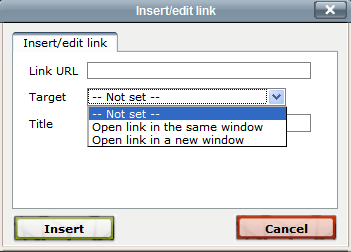
Open link in same window: Basically just says when they click on the link that it opens in the current window
Open link in new window: When the link is clicks a new tab will automatically open up with whatever the link leads to..
See simple.
The title are the words that will show up when the photo is scrolled over.
Such as this for example.. I used “yesssss” when doing this simple photo link and got.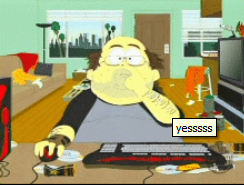
Linking words in blog same as photos?
Is the same process, as I did above with the CLICK HERE to link to other blog
All you do is highlight the writing such as this ...

And then following the same process with clicking link and such as you did with the photo
Emanon

 If I missed something, only pertaining to linking pics and words in blogs, tell Me in a comment and I will add it
This is simply a basic scroll box... as is.. just replace the minor writing in the middle and you are good to go!!
Here Is the basic code
<div align="center"> <div style="border: 1px solid firebrick; width:320; height:240;overflow:auto"></div>
Using this code you simply have to edit the length and height of the box to tell it how big, or small you want it
here is the code
<center><div align="center"> <div style="border: 1px solid firebrick; width:320; height:240;overflow:auto">You can write what ever you want!! WOOT</div> </div></center>
This is a simple Scroll Menu with no border
What it is, is basically combines the scroll menu code with the table code to to do the following
| stuff here |
Here is the code
<div style="overflow:auto; height:300px; width:300px;"><table cellpadding="0" cellspacing="0" style="width:250px;"><tr><td> stuff here</td></tr></table></div>
Like when using a BG code you can also use pictures from photobucket or any other photo storing sites and add a background to your scroll bar!! come on get creative with it
| Aww look i have a BG now haha |
heres is the code
<div style="overflow:auto; height:300px; width:300px"><table cellpadding="0" cellspacing="0" style="width:250px;" width="100%" background="http://i103.photobucket.com/albums/m136/bigwaxx/DARK%20ANGEL/Dark%20Backgrounds/satanic.gif"><tr><td>Aww look i have a BG now haha</td></tr></table></div>
This is to use a color BG using the specific color code of that particular color... in this particular one i used #330066 but you can find a complete of em here True color chart
| stuff here |
heres the code
<div style="overflow:auto; height:300px; width:300px; background-color:#330066"> <br><table cellpadding="0" cellspacing="0" style="width:250px;"><tr><td> stuff here</td></tr></table> </div>
Heres a Basic Scroll Menu with no use of the marquee code
Here is the code
<center><div align="center"> <div style="border: 1px solid firebrick; width:320; height:240;overflow:auto">You can write what ever you want!! WOOT</div></div></center>
*NOTE*
Look in the code you can change the height and width of the box so that a scroll menu or just change the size of the box so the writing just fits
Please take note when using Marquee in the box that only a certain amount of writing will show...
Here is another scroll music menu i made using marquee
Heres the code for that music box
<center><div align="center"> <div style="border: 1px solid firebrick; width:320; height:240;overflow:auto"><font face="garamond" color="gold" size="4"><b>--------------------<br />MUSIC IS MY LIFE<br />MUSIC IS MY EMOTION<br />--------------------</b></font><marquee direction="up"><br /><br /><br /><br />Arch Enemy<br /><br />otep<br /><br />Demuredin<br /><br />insanity<br /><br />skinlab<br /><br />Type O Negitive<br /><br />dillenger escape plan<br /><br />livitihan<br /><br />warrent<br /><br />slayer<br /><br />pearl jam<br /><br />offspring<br /><br />HIM<br /><br />hate eternal<br /><br />fear factory<br /><br />yngvie<br /><br />stevevai<br /><br />dimbagdarrel (god)<br /><br />atr<br /><br />old metallica "old"<br /><br />down<br /><br />death<br /><br />serigo<br /><br />jesses gituar<br /><br />lynard skynard<br /><br />van halen<br /><br />stone temple pliot<br /><br />warren g<br /><br />dream theater<br /><br />john of dreamtheater<br /><br />acid bath<br /><br />morbid angel<br /><br />atari teenage roit<br /><br />iron madien<br /><br />journey<br /><br />dokken<br /><br />zz top<br /><br />eagles<br /><br />posidon<br /><br />iced earth<br /><br />dragonforce<br /><br />queen<br /><br />earth,wind,and fire<br /><br />superjoint ritual<br /><br />damageplan<br /><br />frank zappa<br /><br />captain beefheart<br /><br />F.I.T.O.<br /><br />sepultra<br /><br />obituary<br /><br />helmet<br /><br />tool<br /><br />slipknot<br /><br />chech and chong<br /><br />BT<br /><br />minibosses<br /><br />willie nelson<br /><br />johnny cash<br /><br />inhabit<br /><br />deicide<br /><br />morbidangel<br /><br />the police<br /><br />bee gees<br /><br />SHAFT<br /><br />tenasious D<br /><br />soundgarden<br /><br />anthrax<br /><br />aliceinchains<br /><br />duex machina<br /><br />Jack off Jill<br /><br />The Greatful Dead<br /><br />The Killers<br /><br />Manson<br /><br />311<br /><br />No Doubt<br /><br />Pavement<br /><br />Queens of the Stone Age<br /><br />NIN<br /><br />SMB<br /><br />Kittie<br /><br />Bloodhound Gang<br /><br />exodus<br /><br />machine head<br /><br />bullet for my valientine<br /><br />project mexico<br /><br />shitting glitter<br /><br />napalmdeath<br /><br />daath<br /><br />lambofgod<br /><br />eyehategod,<br /><br />Absolution<br /><br />chimaira<br /><br />prong<br /><br />internal suffering<br /><br />chaotic quest<br /><br />stygian<br /><br />meshuggah<br /><br />hypocrisy<br /><br />god dethroned<br /><br />VG heaven<br /><br />children of bodom<br /><br />the haunted emperor<br /><br />dimmu borgir<br /><br />beneath the sky<br /><br />munity<br /><br />in sorte diaboli<br /><br />Michael Angelo Batio<br /><br />Yngwie Malmsteen<br /><br />Rusty Cooley<br /><br />Chris Impellitteri<br /><br />Shawn Lane<br /><br />Gus G.<br /><br />Darrel Abbott<br /><br />Paul Gilbert<br /><br />Theodore Ziras<br /><br />Buckethead<br /><br />Steve Vai<br /><br />Joe Satriani<br /><br />B.B. King<br /><br />Willie Adler<br /><br />Mark Morton<br /><br />Adrian Smith<br /><br />Dave Murray<br /><br />Kerry King<br /><br />Jeff Hanneman<br /><br />Daron Malakian<br /><br />Alexi Laiho<br /><br />Roope Latvala<br /><br />Zakk Wylde<br /><br />Kirk Hammett<br /><br />K.K. Downing<br /><br />Glenn Tipton<br /><br />Randy Rhoads<br /><br />Jesper Str?mblad<br /><br />Jon Donais<br /><br />Amon Tobin<br /><br />Unmurphys mgee<br /><br />Saxon<br /><br />Venom<br /><br />Carcass<br /><br />Dark Throne<br /><br />Sepultura<br /><br />Nile<br /><br />Dark tranquilty<br /><br />Faith no more</marquee></div></div></center>
Heres a basic Scroll table i did
Heres The Basic Scroll Menu code
<center><div align="center"> <div style="border: 1px solid firebrick; width:320; height:240;overflow:auto"><font face="garamond" color="#006699" size="4"><b>--------------------<br />Words do <u>NOT</u> have<br />to be placed here<br />--------------------</b></font><marquee direction="up"><br /><br />LOOK IM SCROLLING LMAO</marquee></div></div></center>
*NOTE*
to change the size of the box within the code you will see both Height and Width Attributes, just change the numbers larger or smaller,
Also please take not you DO NOT have to have it automatically scrolling if you do not want it to auto scroll simply remove the MARQUEE code attributes from within the code and then than you will get something like this
this is the code for above
<br /><center><div align="center"> <div style="border: 1px solid firebrick; width:320; height:240;overflow:auto"><font face="garamond" color="#006699" size="4"><b>--------------------<br />Words do <u>NOT</u> have<br />to be placed here<br />--------------------</b></font><br />BLAH BLAH BLAH<br /><br />BLAH BLAH BLAH<br /><br />BLAH BLAH BLAH<br /><br />BLAH BLAH BLAH<br /><br />BLAH BLAH BLAH<br /><br />BLAH BLAH BLAH<br /><br />BLAH BLAH BLAH<br /><br />BLAH BLAH BLAH<br /><br />BLAH BLAH BLAH<br /><br />BLAH BLAH BLAH<br /><br />BLAH BLAH BLAH<br /><br />BLAH BLAH BLAH<br /><br />BLAH BLAH BLAH<br /><br />BLAH BLAH BLAH<br /><br />BLAH BLAH BLAH<br /><br />BLAH BLAH BLAH<br /><br />BLAH BLAH BLAH<br /><br />BLAH BLAH BLAH<br /><br />BLAH BLAH BLAH<br /><br /></div></div></center>
basically without marquee code the "viewer" will have to manually scroll down, though there is a way to control speed of speed that is for ore advanced users for now i will just post this and later on post the advance codes for more advance users.
Okay, following up with My previous blog in this folder, getting the URL of images, a friend asked Me how to post pics in blogs on fubar… so here shall be a rather quick blog just to show her how.. If any of you want Me to discuss anything more in depth on this subject leave a comment and I will add on to this blog.
Okay when you go into either post new blog or edit blog you get the following header of the post
what you want to focus on in the header is that little tree on the bottom row 
Depending on what you use Photobucket, tiny pic or any of the other photo hosting sites [or with the use of the previous blogs that manner of getting URL from places like myspace works as well. Myspace is a great place for photo hosting, has no real band width that I can see and you can hold unlimited pics]
Below are a screen shot from both photobucket and tiny pic

For both copy the URL that appears in the “Direct link” box and then just paste them in the Image URL box of the previous box as shown below 
I know people will ask so I shall just answer what each box means below
Image Description - sometimes depending on the browser the person is using the photo may not show, in the event of this happening your image description shall show giving the person a hint of what it is [such as if it was a picture of a cat, just put photo of a black cat etc etc]
Alignment – this will tell your picture where to go on the post as well as how to “act”
Top –means only one line of your writing shall be on the same rows as the pic, the writing will be on the top line off to the right with the pic and the rest of the writing will go under the pic
Middle - like with top the writing will be to the right of the pic except the writing will start in the mid point of the pic
Bottom. –like top except the writing goes at the bottom line of the pic and the rest of the writing continues
Left tells it to always stay on the left of your blog, right tells it to always stay on the right side of the blog etc etc This is a general for Me, cause when you place the photo on left or right, the writing curves around the pic so you do not have that huge EMPTY SPACE till the writing clears the next pic
Dimensions – this is where you can alter the length and width of the image, if you are unsure how large or small you want it, you can just click okay and then click on the picture on the edit screen and drag it larger or smaller manually which is rather easy
Border - this tells the image how far away to stay from the edges of the blog,
Vertical and Horizontal space. This tells the writing how far away to stay from the pic itself.
Knowledge of HTML
If you have knowledge of or just know basic photo posting and editing HTML all of the same stuff mentioned above can be done using the HTML button located directly to the right of the image insert/edit image button [the green tree] 

That is pretty much it to posting pics in blogs…
This blog was thrown together rather quickly so if there is something unclear or something you want Me to add to or whatever, just comment and I shall add
Friend asked me something quite simple, how to get the URL from images, but me being longwinded... this is what you get... :P
Okay this shall be a quick and simple blog a friend wanted to know how to get the properties of images to use in the Photo URL code, this shall be a continuation of my linking code so will put some of the same stuff from the blog here [http://www.fubar.com/blog/215584/991624]
I use web browser, Mozilla Firefox 3.2 [maybe 3.3] so depending on your drop down menu may have different options depending on your browser and/or settings, but shall always have properties on it.
To get the URL for any photo, on any website [granted they do not have right clicking block on it, which I shall cover further down]
Simply right click on it, when you do a drop down menu should come up like this.
When you have the image you can either save the image to your computer and upload it on your image hosting site of choice [photobucket, tiny pic, etc] when you do this those sites will give you the Pic hosting URL, as well as the Direct link or just the URL of the image such as http://....
Though for the sake of this blog I will just show you how to get the Direct link of the Image.
Click on Properties, usually on the bottom of the list
When you click on the properties a box like this shall pop up.
Understand when this pop ups you usually have two properties, the link properties [if the photo links to some one], and what you want which is the image properties, right under that bar simply highlight the image properties like so. 
then copy and paste that URL into the image src code such as
![]()
And that is it, the image shall now show.
Exceptions!!
Some sties have outside linking of their pics on restrictions so the photo will not show up, so in these cases you will have to upload to one of your photo hosting sites…
MYSPACE!!! THE BEST PHOTO HOSTING SITE….. REALLY?!!!
Yea when I ask friends what photo hosting sites they use, you typically get the usual photo bucket [any one who knows me knows I am a photobucket addict, my photobucket has nearly 90,000 photos in it] yet another photo hosting site…which is better then photobucket for the most part for a few reasons.
>UNLIMITED photos
>>Unlimited bandwidth
>>>Photos shall always show.
While myspace, like photobucket has some limitations on what you may upload such as no adult graphics, no nudity, nothing illegal or sexual and things of that nature once you upload the stuff and if it fits their criteria of what you can upload then you can use the same steps above and have a myspace account with the ability to hold an unlimited photo amount as well as have no band width to worry about!!
 [Friend asked what is bandwidth as it pertains to photobucket] If you have a paying photobucket account you have unlimited bandwidth so there is no worry, If you have the free photobucket, the bandwidth is the number of times that your photo is shown/account is visited. If you see websites that have lots of visitors sometimes you will see this with the photo. This Means the accounts photos/visit amounts has been over the allowed limit per month and will be that way until it resets once a month.
Blah I think that is all... If I missed anything tell me I will add or correct.
 The code for this would be
*as you can see nothing has changed except you switched text for the photo code*
Link in new tab...
The code for the above is
In case you hate that "border" around the pics that are linked this also can be with a simple adding "boder="0" within your image code such as this
The code for the above
*IMPORTANT WHEN LINKING*
Remember to always write out the code, never write www.fubar.com, always write http://www.fubar.com, an example of why a code must always be written out in its entirely is below...
link without http
Though the link is to www.fubar.com when there is no http:// before it will bring you back to a error page, or some sites have it so it simply brings you back to current page
The code for this would be
*as you can see nothing has changed except you switched text for the photo code*
Link in new tab...
The code for the above is
In case you hate that "border" around the pics that are linked this also can be with a simple adding "boder="0" within your image code such as this
The code for the above
*IMPORTANT WHEN LINKING*
Remember to always write out the code, never write www.fubar.com, always write http://www.fubar.com, an example of why a code must always be written out in its entirely is below...
link without http
Though the link is to www.fubar.com when there is no http:// before it will bring you back to a error page, or some sites have it so it simply brings you back to current page
 When linking remember to always close the link with , if you do not do this then all the text that comes after the linking code will all be linked to where ever you linked it to...
*other linking stuff*
-You can alter the font any way you wish to when using link (font alteration in another post in a blog folder*
-If your photo is to large you can alter the size to better fit with linking (look at Changing the Size of your image post in this folder)
When linking remember to always close the link with , if you do not do this then all the text that comes after the linking code will all be linked to where ever you linked it to...
*other linking stuff*
-You can alter the font any way you wish to when using link (font alteration in another post in a blog folder*
-If your photo is to large you can alter the size to better fit with linking (look at Changing the Size of your image post in this folder)
 Should be clear enough...
|
|
 | >~HOPE THIS HELPED~< |
 Image Linking Titling
Using my Fubar page as a link in conjunction with the previous pic
Image Linking Titling with no link border
Using my Fubar page as a link in conjunction with the previous pic
Image Linking Titling
Using my Fubar page as a link in conjunction with the previous pic
Image Linking Titling with no link border
Using my Fubar page as a link in conjunction with the previous pic


